Table of Contents
Tutorial: Pivot to BoundingBox Center
This tutorial is about setting the 3D Object's Origin to the center of the BoundingBox using Blender. The intention is to fix some of the issues raising up by using Unreal Engine 4's TeleportTo Function, which uses the bounding box origin and pivot point internally for collision checking translations.
Here's a link to a video, showing the process:
Otherwise you can also follow the text blow.
Part 0: See which Unreal Object to fix
- Open up your UE4 Project
- Open up one of you Meshes
- Set the Perspective to Front/Back/Left/Right
- (optional) Change Wireframe to Lit to get a better look.
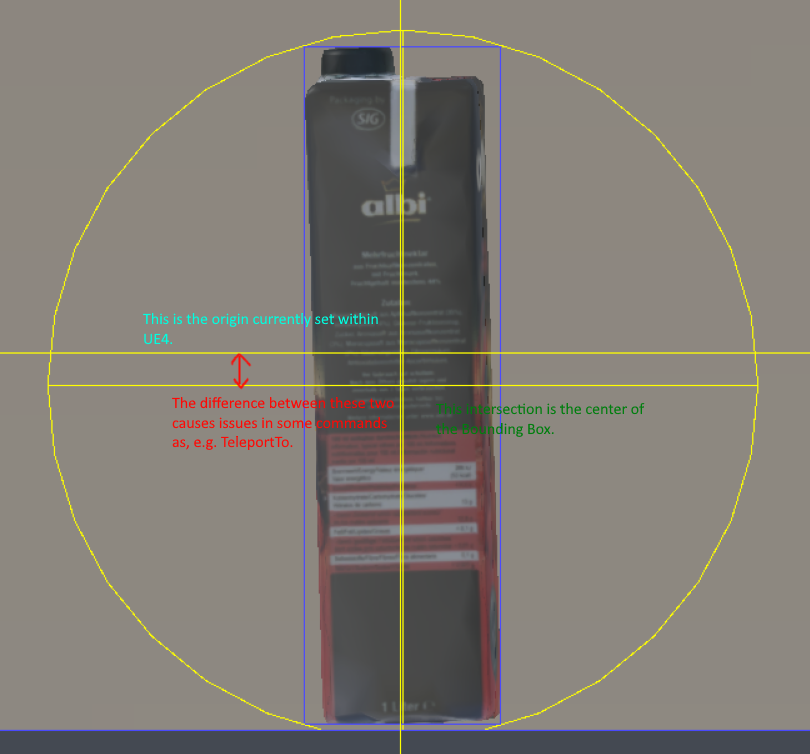
- Click on Bounds…
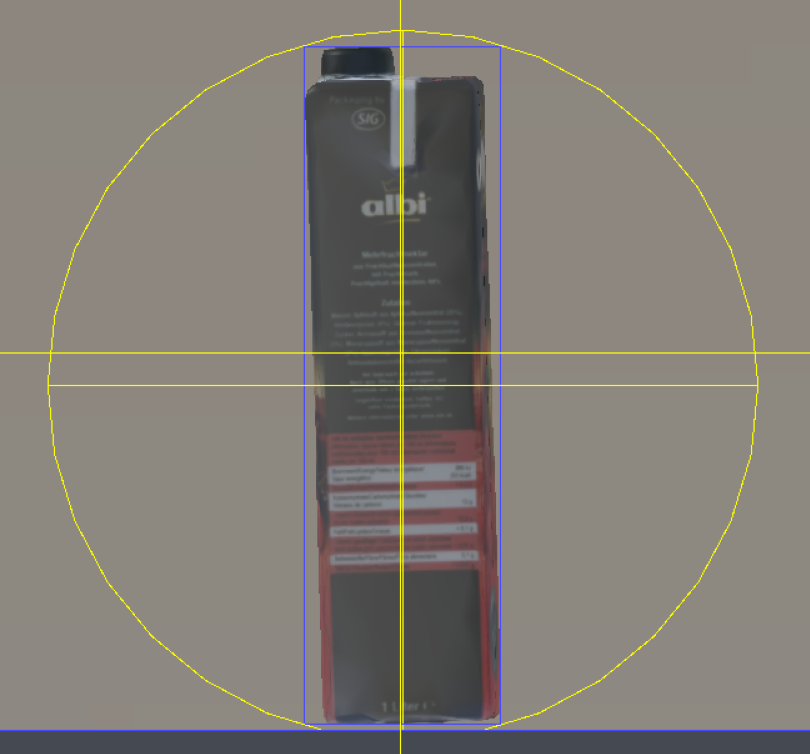
You'll see that there are two lines indicating some sort of center. The Circle's center is the BoundingBox's Center, whilst the long lines heading outwards are indicating the position of the currently set origin/pivot. If there is a difference as seen in the picture it does need to be fixed.
Part 1: Export Object out of Unreal Engine 4
This step is completely skippable if you already have the available .fbx files or, even better, available .blend file. This is only intended in case you do not have the original files for various reasons.
- Open your Game Project.
- Navigate to your Meshes folder or where you've put your desired Mesh.
- Right-Click and click Asset Actions>Export.
- Export it as any .fbx file, putting it somewhere you can find.
- Done
Part 2: Change the Origin
(Check the video on the top of this page for a walk-through)
- Open up Blender, removing the Default Cube.
- Import the .fbx file either by…
- … using the “Search Menu” shortcut(key “F3”) and typing in Import, selecting .fbx from the result.
- … going to File>Import>.fbx and importing your .fbx this way.
- Click on your newly imported asset to select it.
- Press “.” and press on “Bounding Box Center” in the upcoming Menu.
- Alternative is using the Search Menu(key “F3”), typing in Bounding Box, and clicking on that instead.
- Go into Edit Mode, default using the “Tab” Key, pressing “A” to select all the faces.
- Press “Shift-S”, selecting “Cursor to Selected” putting the Cursor to the Center of the Bounding Box
- Exit the Edit Mode by pressing Tab again.
- Change the Origin of the object to the Cursor by either…
- … Pressing Object>Set Origin>To 3D Cursor in the Top-Left of the Screen Port.
- … using the Search Menu typing “Set origin” and selecting “To 3D Cursor” from there.
- F3 - “Cursor to World Origin”
- F3 - “Selection to Cursor”
- After this it's done and you can export it!